Time-Saving Beauty Tips

Here are a few of my favorite tips to spend less time in front of the mirror and get more beauty sleep. (Lately, for class, I do well just to get some moisturizer and mascara on.) Depending on your school and jobs, who believe less is more, these tips may be beneficial to you and allow more shut-eye.

Skip the Morning Shower
Studies are being shown that your natural oils are actually better for you than scrubbing it all away in the shower. Not only that, many gallons of water are saved. Oily hair? Dry shampoo is a great solution. Even cheaper (possibly household) solution?: Baby Powder.

Try: Pssst Dry Shampoo

No Foundation
Let your skin breathe, don't cake product on all day every day. (Especially in warmer weather!)  Try a tinted moisturizer (even better, an energy-boosting one) Treat problem areas with concealer.

Try: Origins VitaZing Moisturizer.

2-in-1 Products
Look for products that serve multiple uses. cheek highlight & eyeshadow, bronzer & contour, double ended products, etc. Use a peachy blush, or something a little darker than your skin tone (depending on your coloring), that can give the right effect and look like you applied contour, bronzer, and blush.

Try: MAC Blush in Margin

Don't Layer Products
"This product lengthens, this one volumizes" etc.  This is especially the case for mascaras.  Look for mascaras that are all-in-one products and provide everything they advertise.  Layering products means you have to take the time for the first layer to dry/set.

Try: L'Oreal Telescopic Carbon Black Mascara

Blank Canvas
Most places actually frown upon colored eyeshadow and eyeliner.  It does make your eyes pop, but it is also somewhat distracting, especially if it's not done right.  Applying six eye shadows and getting it perfectly blended does take a lot of time; save these looks for nights out.  Skip the eyeshadow altogether if you can.  If your eyelids are red/purple because of veins.  Get a cream matte eyeshadow that matches your skin tone. Most cream products can stay without primer.

Try: MAC Paint Pot in Soft Ochre
Brightening Effect
If you still need/want that extra pop in your eyes, try a champagne/nude metallic (rather than white) eyeliner in your inner corner and waterline.  This can give a subtle widening effect for sleepy eyes.

Try: MAC Eye Kohl in I Get No Kick
Skip the Brushes
Grab products that are a in a twist-up, pencil, or wand form. Some people are grossed out about applying product with their fingers, if that's the case, keep it minimal. It takes a lot of time to switch back and forth between brushes, then even more time to clean them at the end. Pour brush cleanser into a spray bottle rather than the regular bottle it comes in to save product and avoid excess mess.


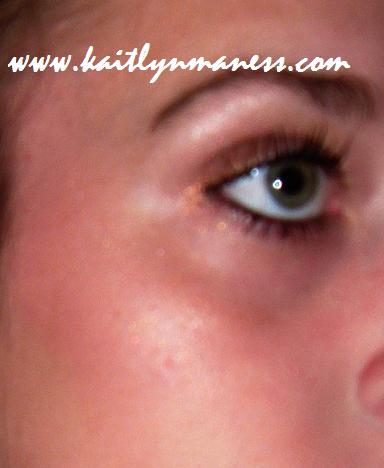
FOTD: Nearly Natural


Face: Origins Vitazing Moisturizer, MAC Margin Blush
Eyes: MAC Brow Pencil in Lingering, MAC Soft Ochre Paint Pot, MAC Technakohl in Graphblack (waterline & tightline), MAC Eye Kohl in I Get No Kick (inner corner), L'Oreal Carbon Black Lineur Intense (lash line), L'Oreal Telescopic Carbon Black Mascara
Lips: MAC Velvet Teddy Lipstick (lightly applied)


Follow / Subscribe / Twitter / Instagram

February Favorites

"Favorites" posts/videos discuss the products (and other misc things) you loved for that month. The products can either be purchased that month or (old) "rediscovered" items. Favorites are published at the end of the current month or at the beginning of the following month."


Coach Poppy
I was surprised I liked this because I'm usually more into somewhat masculine meets sexy scents. This one is completely girl - floral, fruity, summertime.  I loved the sample so much I had to purchase the full bottle.

Eco Tools Travel Brushes
Great set of travel brushes, pretty high-quality brushes for the price.  More in-depth review to come.

MAC Velvet Teddy Lipstick
This is my first matte lipstick.  I had to step away from the viva glams because I used the B2M program for this.  Supposedly it's a dupe for the color Megan Fox often wears.  It's a very light brown.  It's one of those the color-of-your-lips but better shades.

MAC Well Dressed Blush
A pale baby pink in the pan, but a gorgeous color once it meets the skin.  Perfect for everyday wear.

OPI Fiji Weejee Fawn
I think this has made my favorites the past three months?  I constantly reach for it.  A champagne/nude metallic.

OPI Teenage Dream
A fun pink, it takes 3-4 coats to match the bottle though.  Maybe more practical over another shade.

Physician's Formula Shimmer Strips Vegas
Dupe for Bobby Brown Shimmer Bricks, I would always use a pigment for highlight; powder is so much more practical, especially when in a hurry.  Gives a nice glow.

Tweezerman Tweezers 
I never understood what the point of purchasing $20 tweezers was, all tweezers do the same thing, right? Wrong. Hair literally jumps into these tweezers! I can get rid of hairs that I couldn't even see to begin with. They seem to be less painful, too.  You can send them and get them sharpened at any time.

Zoya Remove Plus
The best nail polish remover I have ever used.  Plus, the no-spill bottle pump is a major plus. It is acetone but it's moisturizing at the same time.  It can even get glitter polish off.  It smells good, too... lavender meets a male's shaving cream.  I will be repurchasing the huge refill bottle!

Follow / Subscribe / Twitter / Instagram

Maximize your MAC Palette

I've seen a few blogs and YouTube tutorials on this.  My first thought was I'd never "ruin" my palettes (pop out the insert) because I feared my eyeshadows would not stick and break.  But when I realized I was about to have to purchase a third palette, it was time to do something.  With this method, your palette will hold 26 eyeshadows, almost double the original 15.


First, empty out your palette. You will pop off the plastic insert by wedging a butter knife between the 6 clips. (Marked below.) It should easily pop off.  Then you will have to glue the magnetic insert at the bottom down. (It's not attached.) Keep the 15 plastic insert, you can easily clip it back in if you change your mind.


Next, arrange your eyeshadows however you want them.  For the maximum 26, use the guideline below.  Remember, you're not only limited to MAC eyeshadows you can now put any size pan with a magnet into this palette. 


Optional - you can put the names in the case.  This is especially great if you do tutorials often.  No more picking up the pan and occasionally chipping it to see the name on the bottom.  Some people just use labels.  I think the picture method looks a lot neater.  How to: take a picture of your eyeshadows.  Upload it to your computer and open it with any photo editor (Paint, Photoshop, even Word.) Resize the picture to 7.25"x4.75" (it can be a little smaller, just don't exceed this measurement or your palette won't close properly.) Use the text box feature to add the name over each eyeshadow. (My original template is above, click to enlarge.) Print, cut out, then attach it to your palette... I used photo splits to attach mine; double-sided tape would work too, you could even glue it if you know you won't rearrange your eyeshadows.


Before (July 2010 click here) original 15 eye shadows to After (now) 26 eye shadows.

I really do like having more eyeshadows in the same palette.

Pros:
-It saves time because I'm not switching back in forth between multiple palettes.
-Before the eyeshadows were just spaced too far apart.
-The powder usually made a mess getting all over the black insert making the palette look completely messy.
-Save Money (you can almost fit double the eyeshadows into one palette, saving $15), buying pans is also cheaper. Click here for a price comparison.

Cons:
-Not travel-friendly.  The pans just don't feel secure to travel often.  You should probably pick up a few MAC quads, or even better, a Unii Palette (click here.)

Follow / Subscribe / Twitter / Instagram

Three Must-Have Brushes


I honestly do not have an amazing brush collection, like most bloggers and gurus.  I've always stuck to drugstore and ELF brushes.  I've finally realized good brushes really do the work for you.  I thought it was just lies that spoiled gurus and sales assistants sold to you. Some brushes are a little pricey but I'm beginning to see you get what you pay for.

I'm only willing to pay about $25 for a brush (there's plenty of MAC ones I want for $50-$70 each.) Unless you're a makeup artist, I really don't think those are practical prices.  Luckily, there's Sigma that makes dupes of most MAC brushes.

Over the past month (maybe a little more), I've discovered three new brushes that have made a difference.

MAC #217 Tapered Blending Brush $22.50
(Sigma has multiple similar blending brushes at $9 each.)- This has been on my wish list forever, I finally picked it up with some Christmas money. This is my fourth MAC brush; it really should have been my first.  It makes applying crease color so easy.  It's great for blending out all the eyeshadow once your eye color is complete, too.  I have been using the ELF Blending Brush forever, I assumed it was similar enough but I was completely wrong.  I got rid of my ELF brush a few days after I purchased the MAC one.

Sonia Kashuk Synthetic Concealer Brush $9.99
I was on the hunt for a brush to apply Paint Pots and other cream and liquid products.  Obviously, authentic hair brushes are out of the question (massive buildup and bacteria.) So I ended up doing some research.  This brush was the size I wanted, if it could apply creamy concealer it can apply Paint Pots. I was right. No more using my finger or other brushes definitely not made for cream products. I also love the shape of the handle, the curves are exactly were your hand grip goes, it's a lot more comfortable to hold than regular brushes.

Sigma Tapered Highlight F35 $16
A lot of brands don't offer a highlight brush, just because any brush can easily apply loose powder for a highlight.  I used to use a regular face brush but hold it awkwardly to get the right shape/angle for a highlight. After reading this post, I immediately had to purchase it.  It makes applying highlight powders so easy and looks absolutely flawless.

FOTD using all three brushes:


Eyes:
Sonia Kashuk Concealer Brush to apply MAC Chilled on Ice Paint Pot, MAC 217 Brush to apply Bronze Eye shadow in the crease and outer V. Sigma F35 Brush to apply NYX Nude Pearl Pigment. (Also used MAC Lingering Brow Pencil, L'Oreal Telescopic Mascara, & Urban Decay 24/7 Glide-On Pencil in Zero.)

Cheeks:
Sigma F35 Brush ro apply NYX Nude Pearl Pigment and MAC Well Dressed Blush

Follow / Subscribe / Twitter / Instagram

Review: Sally Hansen Nail Polish Strips

I saw these in a magazine ad a few months ago. I thought stick-on nail polish sounded really cool, plus an easy, fast application, mess-free and smell-free. -- wrong.


I picked a box up at Wal*Mart a few weeks ago. I was a little annoyed and shocked at the price - $8.50 My immediate thought was that's a bottle of OPI that will last forever. (Other bloggers have stated they paid as high as $13.) This was just one manicure. Being curious, I still purchased one.


Sally Hansen Salon Effects Nail Polish Strips in Frock Star

I followed all instructions but the application process was still annoying - I have long, skinny nails. I used 3/4 (length) of each sticker.  But I still had to cut and file down the sides because it completely flooded my nails. - On some nails, it ended up chipping (one ripped) immediately from so much tugging and filing for the perfect fit. Then by that time, the sticker was barely sticky - I ended up using some brush-on nail glue beneath the polish on a few nails to make it stay. - Overall, not worth the time and effort and still looked somewhat chipped. - Only my thumbnail actually looked decent, the sticker was smaller than my nail, so it stretched and fit properly (how instructions say it should.)

I thought this would be easy, fast, nail art. (With skinny nails, wrong, it takes too much effort for the perfect fit.) and great for people who travel or people in the office space - no smell, no mess. again, wrong.  The smell was almost as bad as an original nail polish bottle itself. Plus, it made a mess (paper wise) each sticker has 5 parts - tip, top cover, bottom cover, and the actual sticker itself,  and then the excess polish after you fit it properly. (See below for the mess.)


"Last up to 10 days."  Was another reason why I purchased these.  Most nail polishes only have a flawless look for three days, I thought with an actual sticker there may be hope -  10 days? no way... It already chipped immediately after application.  On the third day of wear, two nails completely peeled off. - Since there was no way to fix those two nails, I just easily peeled the remaining 8 nails off.

I really liked the idea of these, but for skinny nails, it's just not practical. It's not cost effective either. One manicure and then 6 leftover strips, the biggest nail sticker was the size of my toenail. - I would recommend these to people with shorter, wider nails (cut the strips in half and you could have two manicures, plus it will stretch properly and hopefully make a perfect fit.

Pros:
-no drying time
-glitter was completely smooth (not the flaky kind you get in bottles.)

Cons:
-too much effort for a perfect fit
-too much chipping and ripping.
-made for larger, wider nails
-expensive
-smell
-messy (paper)
 -last only 3 days


Overall: Stick to nail polish bottles...

Follow / Subscribe / Twitter / Instagram